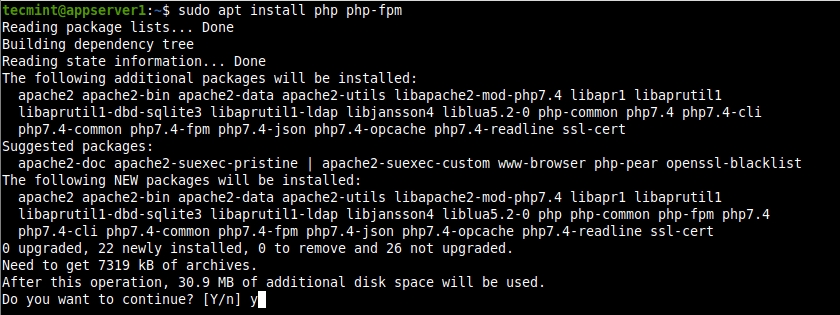
Step 3: Install PHP 7.4 and Related Modules
PHP 7.4 may not be available in Ubuntu default repositories… in order to install it, you will have to get it from third-party repositories.

Run the commands below to add the below third party repository to upgrade to PHP 7.4

sudo apt-get install software-properties-common
sudo add-apt-repository ppa:ondrej/php
Then update and upgrade to PHP 7.4

sudo apt update

Next, run the commands below to install PHP 7.4 and related modules.

sudo apt install php7.4 libapache2-mod-php7.4 php7.4-common php7.4-gmp php7.4-curl php7.4-intl php7.4-mbstring php7.4-xmlrpc php7.4-mysql php7.4-gd php7.4-bcmath php7.4-xml php7.4-cli php7.4-zip
How to Install LEMP Stack with PhpMyAdmin in Ubuntu 20.04
For those of you who don’t know what LEMP is – this is a combination of software packages – Linux, Nginx (pronounced EngineX), MariaDB and PHP.
You can use LEMP for both testing purposes or in a real production environment to deploy web applications using PHP frameworks such as Laravel or Yii, or content management systems such as WordPress, Drupal, or Joomla
You may wonder what’s the difference between LAMP and LEMP. Well, the only difference is the web server that is included – Apache (in LAMP) and Nginx (in LEMP). Both web servers are pretty good and while Apache is the most frequently used one, Nginx doesn’t back down in any way.
Another widely-used application normally installed alongside the LEMP stack is PhpMyAdmin – is a PHP web-based tool for administering a MySQL/MariaDB database server from a web browser.
In this article, you will learn how to install and configure the LEMP stack with PhpMyAdmin in Ubuntu 20.04 server.
Step 1: Installing Nginx on Ubuntu 20.04
1.Nginx is a fast modern web server designed to server many concurrent connections without consuming too many server resources. This is why it’s often the preferred choice in enterprise environments.
NGINX is also commonly used as a load balancer and web content cache. It supports Name-based and IP-based virtual servers (analogous to virtual hosts in Apache).
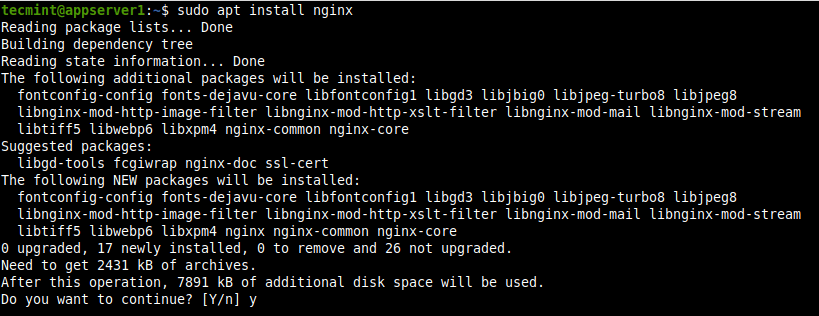
You can install Nginx on your Ubuntu 20.04 desktop or server by running the following command.
$ sudo apt update
$ sudo apt install nginx
The Nginx configuration files are stored under the /etc/nginx directory and its main configuration file is /etc/nginx/nginx.conf. Importantly, its default document root for storing your web files is /usr/share/nginx/html/. But you can use the standard /var/www/html which should be configured in your website’s or application’s server block configuration file.
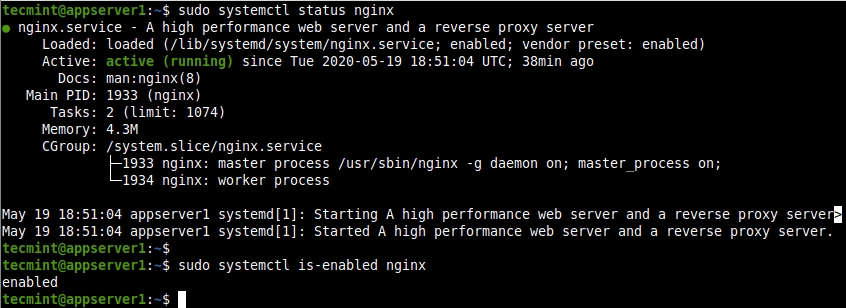
2. The Ubuntu package installer triggers systemd to start the Nginx service and enable it to automatically start every time the server is rebooted. Use the following systemctl commands to confirm that the service is running and is enabled.
$ sudo systemctl status nginx
$ sudo systemctl is-enabled nginx
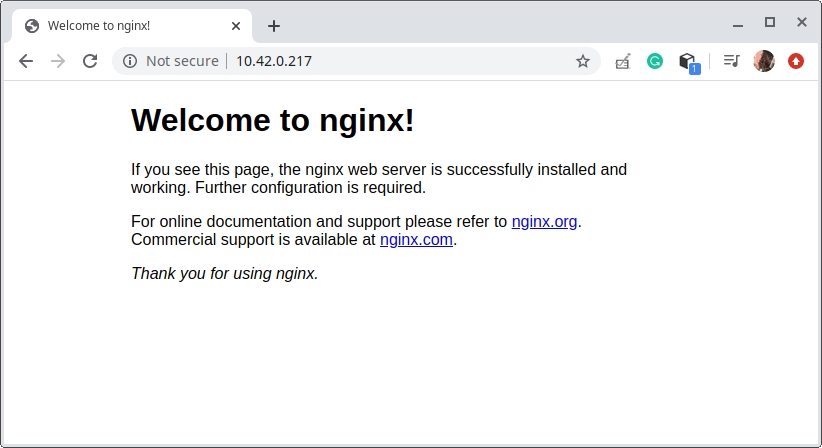
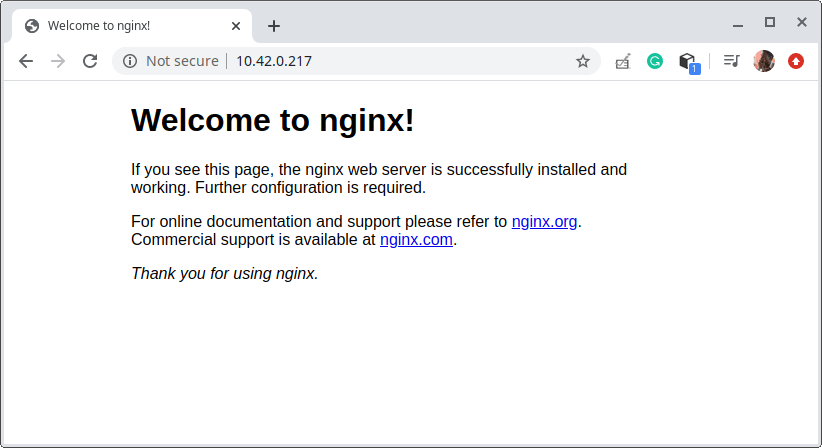
3. Now it’s time to check if the Nginx installation was successful by calling the Nginx page via browser using server IP Address.
http://SERVER_IP
If you don’t know your server IP address, you can find using IP command as shown.
$ ip addr show
Step 2: Installing MariaDB Database on Ubuntu 20.04
4. MariaDB is a relatively new relational database management system that was designed as a community fork of MySQL after it’s Oracle acquisition.
The installation of MariaDB is simple and can be started with command as:
$ sudo apt install mariadb-server mariadb-client
Install MariaDB on Ubuntu 20.04
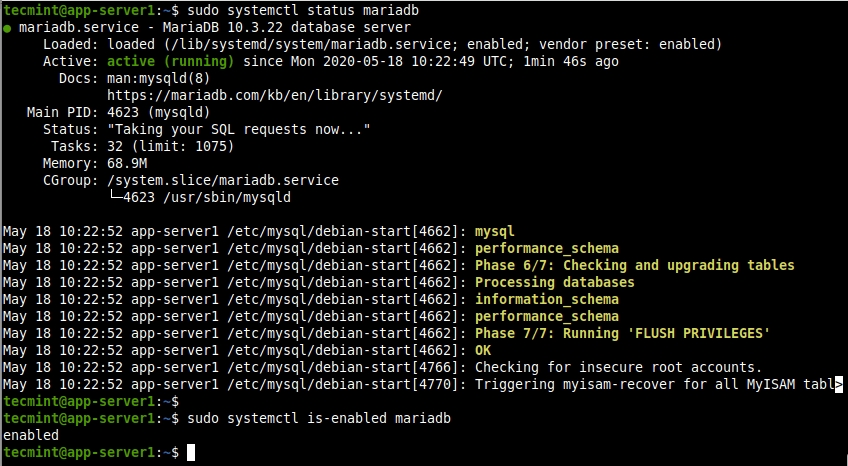
5. The MariaDB service is also automatically started and enabled to always start at system boot and you can confirm this using the following commands.
$ sudo systemctl status mariadb
$ sudo systemctl is-enabled mariadb
Check MariaDB Service
6. If you wish to improve the MariaDB security, you can run the mysql_secure_installation command, which will provide some basic, yet important options to configure:
$ sudo mysql_secure_installation
Then choose the option to set the database root (or administrator) user’s password and follow the prompts and carefully read the questions. To secure your database server, answer the questions as shown in the screenshot.
Enter current password for root (enter for none): Enter
Set a root password? [Y/n] y
Remove anonymous users? [Y/n] y
Disallow root login remotely? [Y/n] y
Remove test database and access to it? [Y/n] y
Reload privilege tables now? [Y/n] y
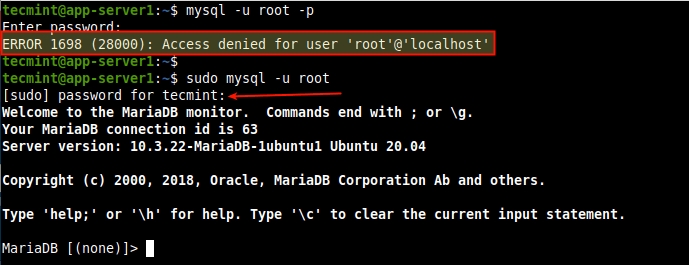
7. To create, manage, and perform database operations, you need to mysql shell command with the -u flag to specify the database username and -p to provide the user’s password.
To connect as the root user, use the sudo command (even without the -p flag) otherwise you will receive the error highlighted in the following screenshot.
$ mysql -u root -p
$ sudo mysql -u root
Step 3: Installing PHP in Ubuntu 20.04
8.PHP is a popular open-source, flexible, and dynamic scripting language for building websites and web applications. It supports a variety of programming techniques. Importantly, the PHP community is large and diverse, composed of countless libraries, frameworks, and other useful components.
NGINX uses FPM (FastCGI Process Manager) or PHP-FPM, to process PHP scripts. PHP-FPM is a widely-used alternative PHP FastCGI implementation that ships with many additional features and it is used for powering high-traffic sites/web applications.
To install PHP and PHP-FPM, run the following command which will also install some required additional packages.
$ sudo apt install php php-mysql php-fpm
Install PHP and PHP-FPM on Ubuntu 20.04
Since PHP 7.4 is the default version of PHP in Ubuntu 20.04, the PHP configuration files are located in /etc/php/7.4/ and the PHP-FPM configuration files are stored under /etc/php/7.4/fpm.
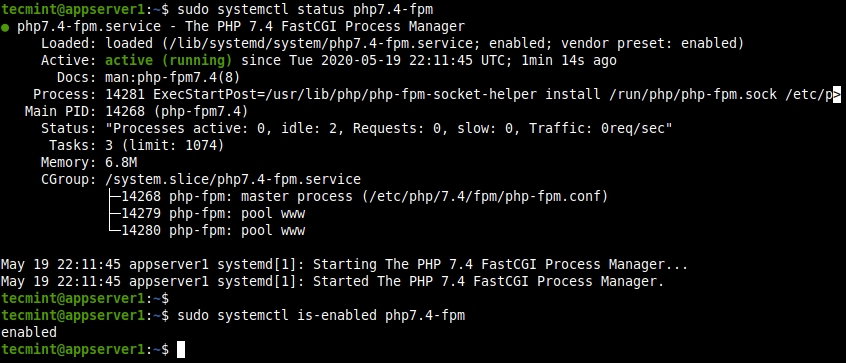
9. Next, check if the php7.4-fpm service is up and running and whether it is enabled with the following command.
$ sudo systemctl status php7.4-fpm
$ sudo systemctl is-enabled php7.4-fpm
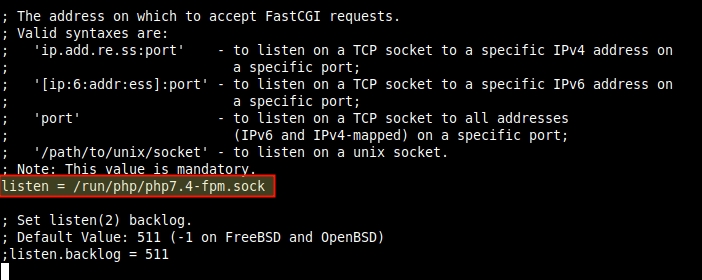
Step 4: Configuring Nginx to work with PHP-FPM
10. Now you need to configure NGINX to proxy client requests to PHP-FPM, which by default is configured to listen on a UNIX socket as defined by the listen parameter in the /etc/php/7.4/fpm/pool.d/www.conf default pool configuration file.
$ sudo nano /etc/php/7.4/fpm/pool.d/www.conf
Configure PHP-FPM Socket
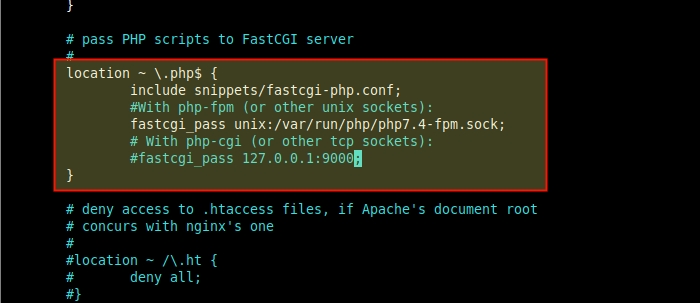
11. In the default server block configuration file (/etc/nginx/sites-available/default), uncomment the location directive for processing PHP requests to look like the one shown in the following screenshot.
$ sudo nano /etc/nginx/sites-available/default
Configure Nginx Block to Use PHP-FPM Socket
location ~ \.php$ {
 include snippets/fastcgi-php.conf;
 fastcgi_pass unix:/var/run/php/php7.4-fpm.sock;
}
Save the file and exit.
12. Then test the NGINX configuration syntax for correctness. If it is OK, restart the Nginx service to apply the new changes.
$ sudo nginx -t
$ sudo systemctl restart nginx
Check Nginx Configuration
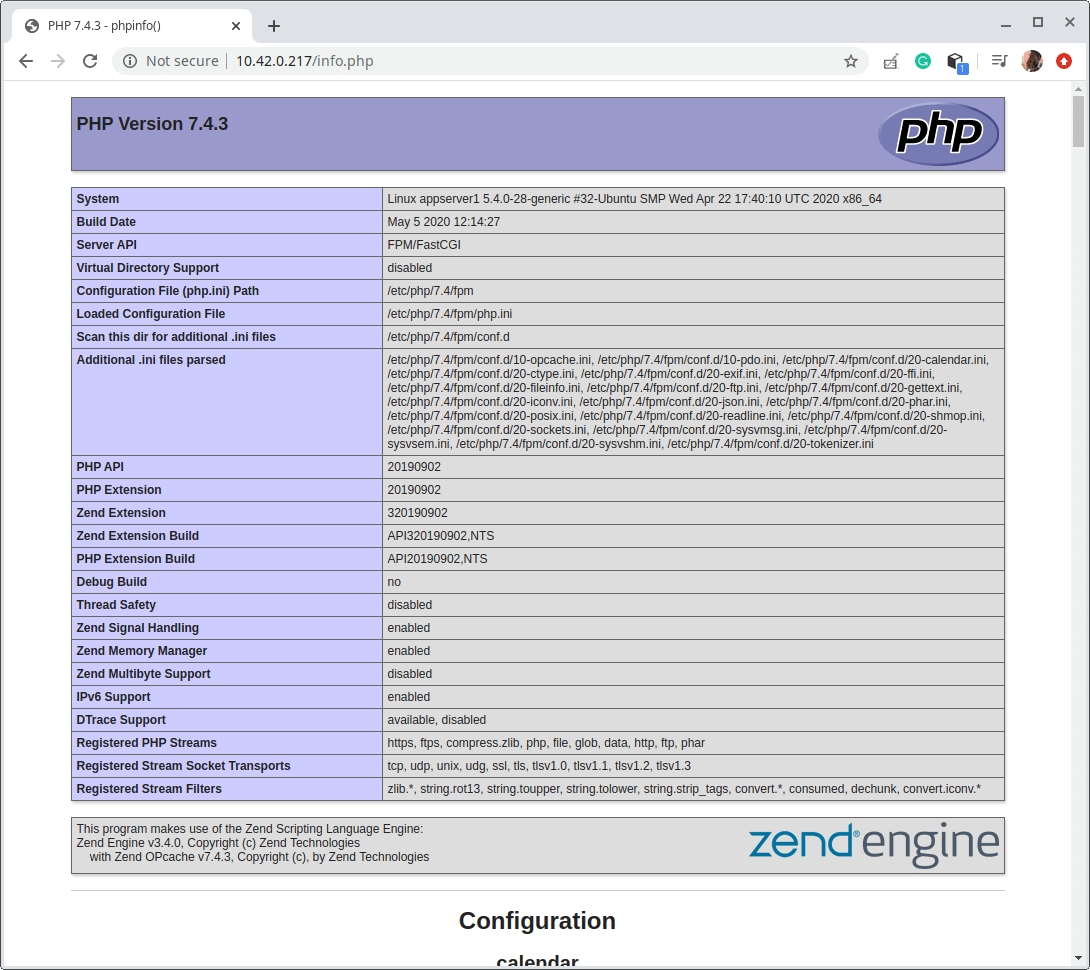
13. Now test if NGINX can work in conjunction with PHP-FPM to process PHP requests. Create a simple info.php page under the document root directory.
$ echo "<?php phpinfo(); ?>" | sudo tee /var/www/html/info.php
14. In your browser, navigate using the following address. The PHP configuration page should load showing as shown in the following screenshot.
http://SERVER_IP/info.php
Check PHP and PHP-FPM Info
Step 5: Installing PhpMyAdmin in Ubuntu 20.04
15.PhpMyAdmin is a free and open-source web-based PHP application specifically created for administering MySQL/MariaDB database servers through a web browser. It provides an intuitive graphical interface and supports a wide range of common features for database administration tasks.
$ sudo apt install phpmyadmin
Install PhpMyAdmin in Ubuntu 20.04
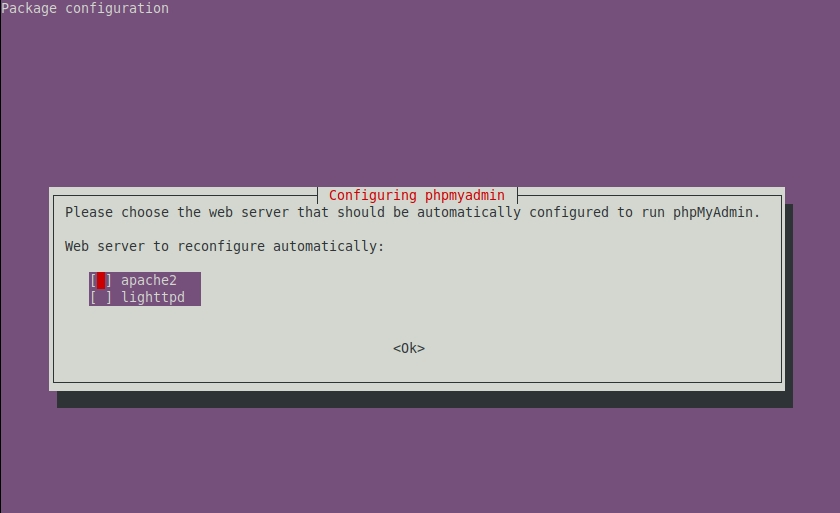
16. During the package installation, you will be asked to configure several aspects of the PhpMyAdmin package. First, will be prompted to choose the default web server for running it. Press Esc because NGINX is not on the list provided.Choose Web Server to Configure PHPMyAdmin
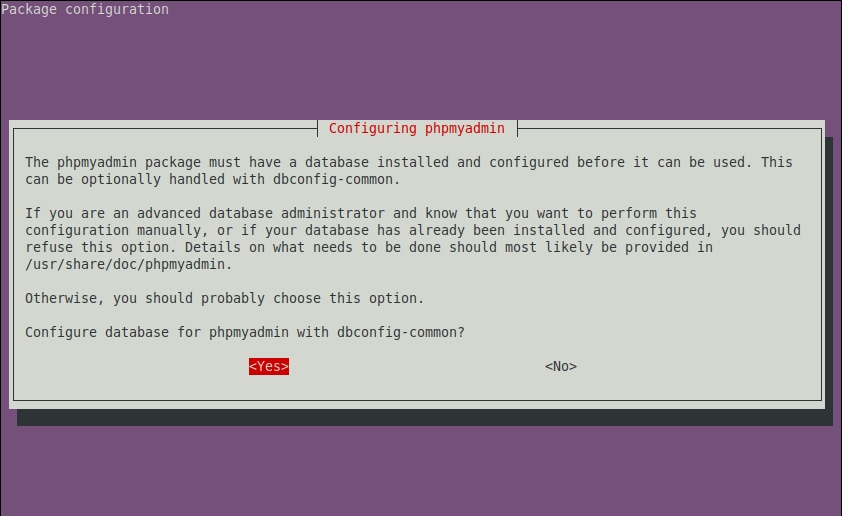
17. Next, PhpMyAdmin requires a database to work with. In this package configuration prompt, choose Yes to configure a database for PhpMyAdmin with the dbconfig-common package.Configure Database for PhpMyAdmin
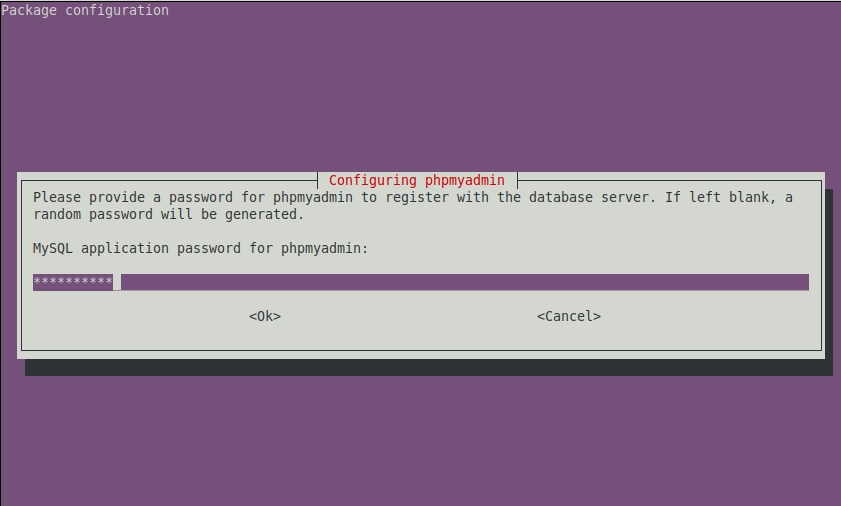
18. In the next prompt, you need to provide a password for PhpMyAdmin to register with the MariaDB database. Enter a secure password and click Enter.Create a Password for PhpMyAdmin
Nhớ Pass vừa đăng ký và nhập user: phpmyadmin
Step 6: Configuring NGINX to Serve PhpMyAdmin Site
19. To enable NGINX to serve the PhpMyAdmin site located at /usr/share/phpmyadmin, create a symlink for this directory under the document root, then set the correct permissions and ownership on the PHPMyAdmin directory as follows.
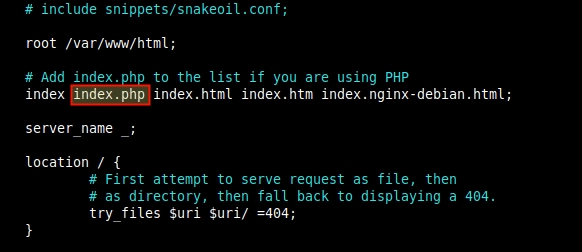
20. Besides, ensure that the index directive in the default server block configuration (/etc/nginx/sites-available/default) file includes index.php as shown in the following screenshot.Configure Nginx Index Directive
21. Next, restart the Nginx service once more to apply the above changes.
$ sudo systemctl restart nginx
22. Now access the PhpMyAdmin site from a browser using the following address.
http://SERVER_IP/phpmyadmin
At the login page, authenticate with the PHPMyAdmin username and password. Remember the remote root user login is disabled unless you are accessing PHPMyAdmin on the localhost where the MariaDB database is installed, the root access will not work.PhpMyAdmin LoginPhpMyAdmin Dashboard
If You Appreciate What We Do Here On TecMint, You Should Consider:
TecMint is the fastest growing and most trusted community site for any kind of Linux Articles, Guides and Books on the web. Millions of people visit TecMint! to search or browse the thousands of published articles available FREELY to all.
If you like what you are reading, please consider buying us a coffee ( or 2 ) as a token of appreciation.
We are thankful for your never ending support.
Chú ý cài còn có cách cài đặt thủ công
How to Install phpMyAdmin with Nginx on Ubuntu 22.04
How to Install phpMyAdmin with Nginx on Ubuntu 22.04
phpMyAdmin is a free web-based management tool for managing the MySQL and MariaDB database servers. Web hosting companies widely use it to enable users to manage databases.
phpMyAdmin helps the system administrator perform database activities such as creating, deleting, and querying databases, tables, columns, etc.
The phpMyAdmin package is available in the Ubuntu repository. But, the package available in it is a bit older version. So, we will download the latest version of phpMyAdmin from the official website.
Generate a blowfish secret and update the below line with the generated secret in the configuration file.
$cfg['blowfish_secret'] = 'CfX1la/aG83gx1{7rADus,iqz8RzeV8x'; /* YOU MUST FILL IN THIS FOR COOKIE AUTH! */COPY
You may also need to uncomment the phpMyAdmin storage settings.
/**
 * phpMyAdmin configuration storage settings.
 */

/* User used to manipulate with storage */
$cfg['Servers'][$i]['controlhost'] = 'localhost';
// $cfg['Servers'][$i]['controlport'] = '';
$cfg['Servers'][$i]['controluser'] = 'pmauser';
$cfg['Servers'][$i]['controlpass'] = 'mypmapass';
COPY
phpMyAdmin requires database tables. So, import the create_tables.sql comes with the phpMyAdmin archive package to create tables for phpMyAdmin.
sudo mysql < /usr/share/phpMyAdmin/sql/create_tables.sql -u root -pCOPY
Next, log in to MariaDB.
sudo mysql -u root -pCOPY
Then, add the user and grant permission to phpMyAdmin’s database.
CREATE USER 'pmauser'@'localhost' IDENTIFIED BY 'mypmapass';

GRANT ALL PRIVILEGES ON phpmyadmin.* TO 'pmauser'@'localhost' WITH GRANT OPTION;

FLUSH PRIVILEGES;

EXIT;COPY
Create Nginx Server Block for phpMyAdmin
Create a server block configuration file for phpMyAdmin under the /etc/nginx/conf.d directory. If you have installed Nginx from the Ubuntu repository, you need to create the file under /etc/nginx/sites-available directory.
sudo nano /etc/nginx/conf.d/phpmyadmin.confCOPY
Use the following server block for phpMyAdmin. You may change the domain name (server_name) as per your requirement (use only the domain name, not the IP address).
The MariaDB root user can log in locally via Unix socket by default. So, you will need to create a database and a user to log in to phpMyAdmin.
CREATE DATABASE app_db;
CREATE USER 'app_user'@'localhost' IDENTIFIED BY 'password';
// GRANT ALL PRIVILEGES ON app_db.* TO 'app_user'@'localhost' WITH GRANT OPTION;
GRANT ALL PRIVILEGES ON *.* TO 'app_user'@'localhost' WITH GRANT OPTION;
// FLUSH PRIVILEGES;
EXIT;
Now, access the phpMyAdmin via browser by going to the phpMyAdmin’s URL.
http://fully-qualified-domain-name
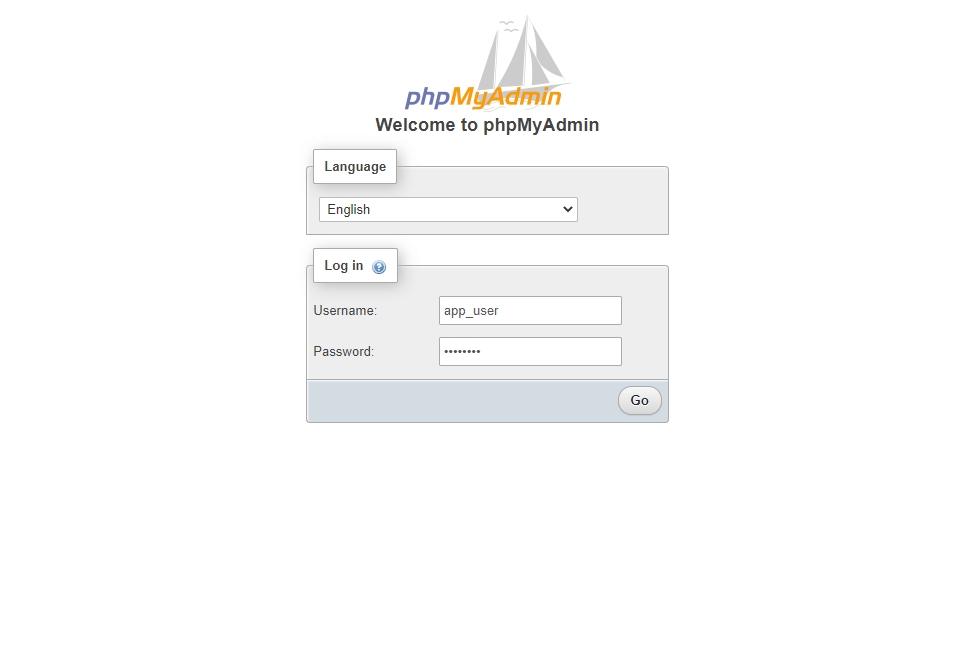
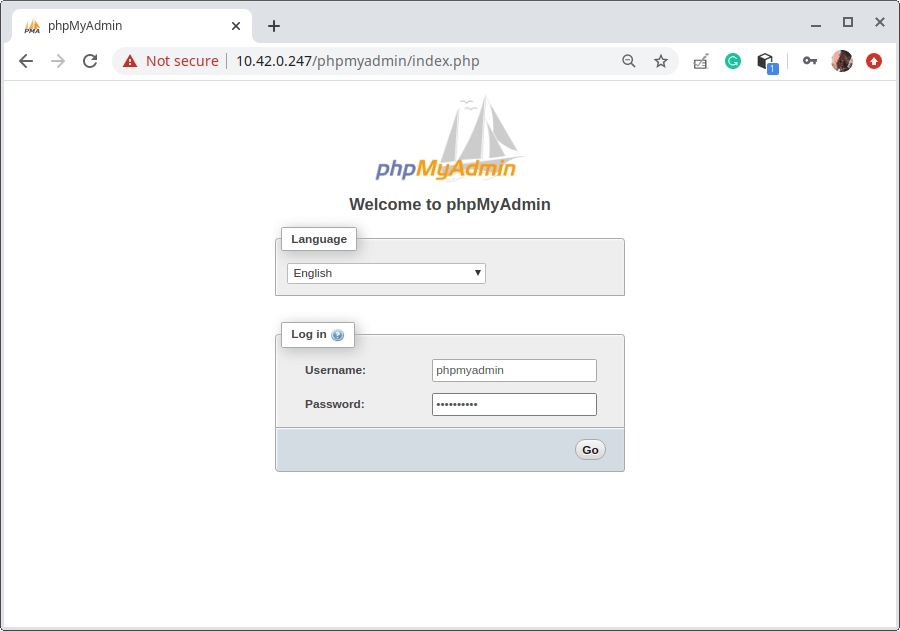
Log in with the database user.
Login to phpMyAdmin
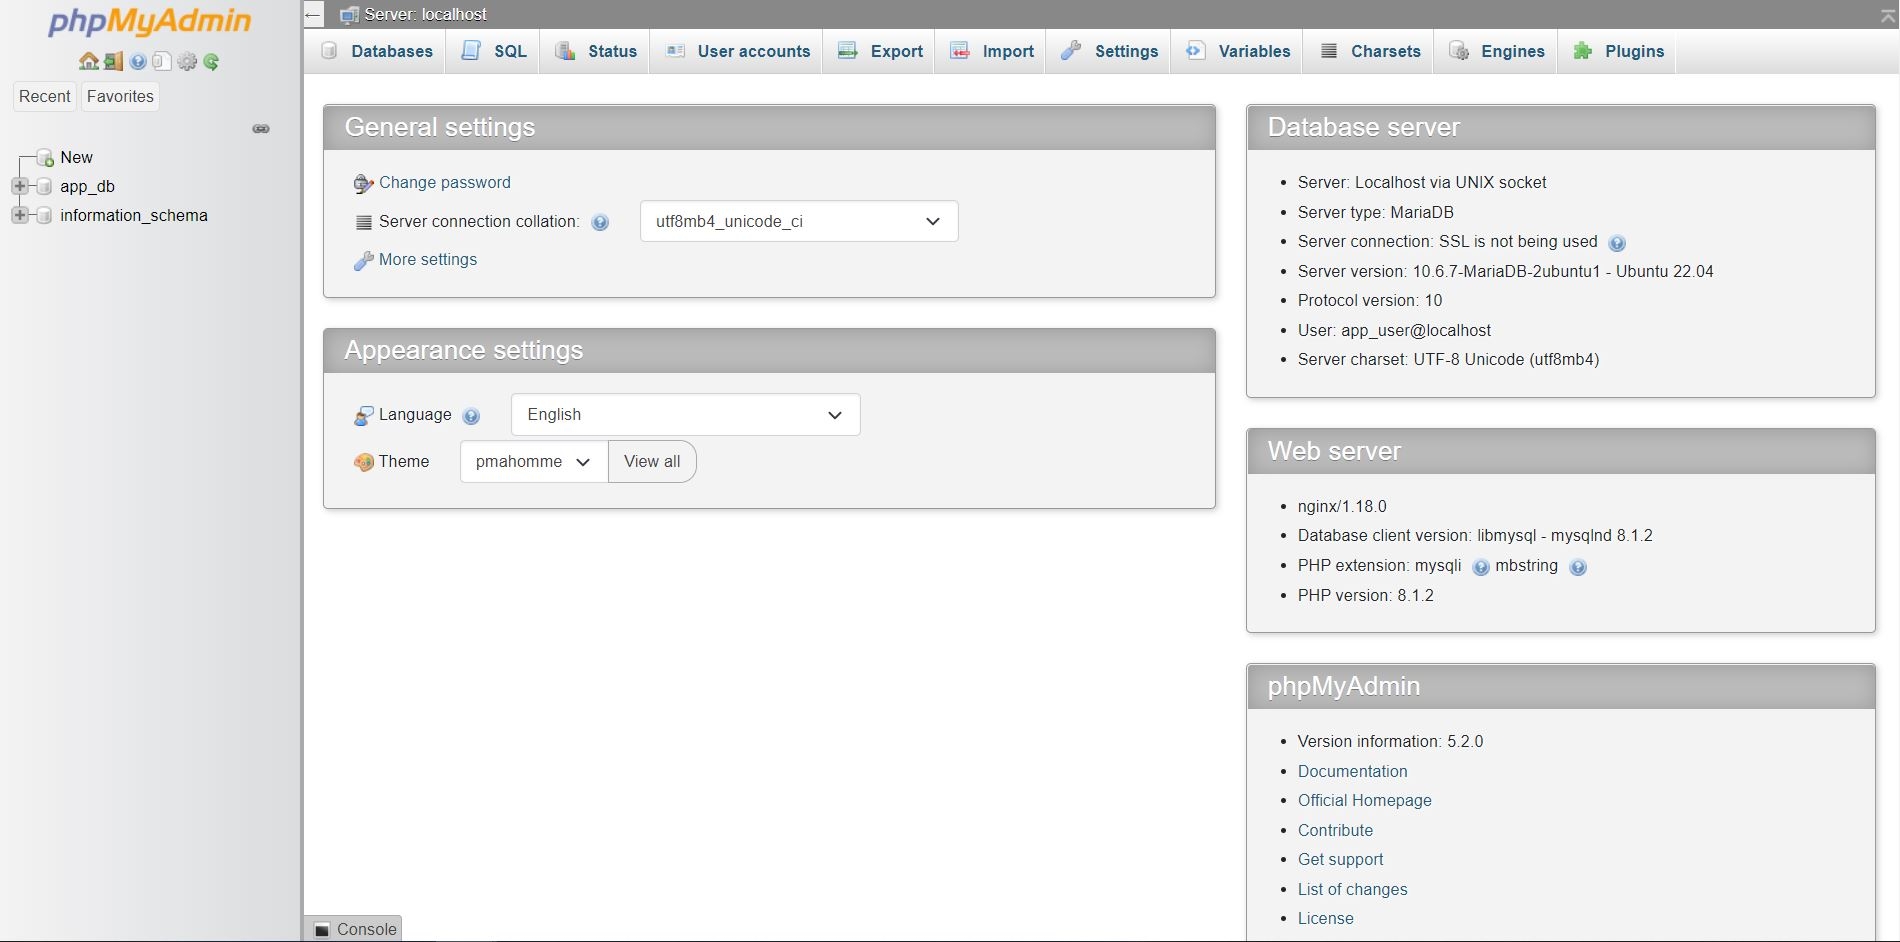
You will get the home page where you can manage databases.
phpMyAdmin with Nginx
Conclusion
I hope this post helped you install phpMyAdmin with Nginx on Ubuntu 22.04. Share your feedback and issues you have encountered while setting this up in the comments section.
How to Install phpMyAdmin with Apache on Ubuntu 22.04 LTS
Tutorial to learn the steps for installing phpMyAdmin on Ubuntu 22.04 LTS Jammy JellyFish using Apache Web server for managing MariaDB or MySQL via web browser and graphical user interface.
phpMyAdmin is popular open-source software that we can get almost on all web hosting services for managing databases. However, if you are managing your hosting or cloud server by yourself then you have to install this Database management by yourself.
The program offers a graphical interface with numerous options. These can refer to a complete database and include, for example:
• Creating a new database
• Delete an existing database
• Copy the content to a new database
• Backup in a backup
• Restore from an existing backup
• Transferring from one server to another
• Changing users and passwords
• Manipulation of access rights
We can perform complex and time-consuming tasks without having to deal with commands and their structure with the help of phpMyAdmin. These include, but are not limited to:
• Find variable names or content in databases
• Replacing Values
• Encryption of plain text using different algorithms, e.g. passwords
• Multiple selections of variables via the graphical interface
• Checking databases for internal consistency and other errors
• Create and delete entries, parameters, or values
• Create, copy or remove individual tables
• Clear presentation of the structure of databases
Let’s learn how to install phpMyAdmin on Ubuntu 22.04 Server, however, the steps are given here will also be the same for other versions of this Linux.
Steps to install phpMyAdmin on Ubuntu 22.04 Server
1. phpMyAdmin Requirements
To perform this tutorial we require an Ubuntu server, a non-root sudo user access, Apache webserver, Database, PHP, and an active internet connection.
2. Update Ubuntu 22.04 Server
The first thing we should perform is updating our Linux server because most of the packages we need to set up phpMyAdmin will come from the default Ubuntu Jammy JellyFish repository.
Copy Me
sudo apt update && sudo apt upgrade
Also, install:
Copy Me
sudo apt install wget nano
3. Install LAMP server
We need LAMP Stack which refers to a software bundle comprised of Apache, MySQL/MariaDB, and PHP installed on a Linux server. Well, for the Linux server, here we are using Ubuntu whereas, the rest we will install in this step.
Apache Webserver
Apache is an open-source web server that is available to install directly using Ubuntu’s default repository:
Copy Me
sudo apt install apache2
Enable its server:
Copy Me
sudo systemctl enable apache2
Copy Me
sudo systemctl restart apache2
Setup MariaDB server
Next, install the MariaDB server which is a fork of MySQL, and work exactly similar to it. Just like apache, it is also available to set up using the default system repository.
Copy Me
sudo apt install mariadb-server mariadb-client
Enable and start
Copy Me
sudo systemctl enable --now mariadb
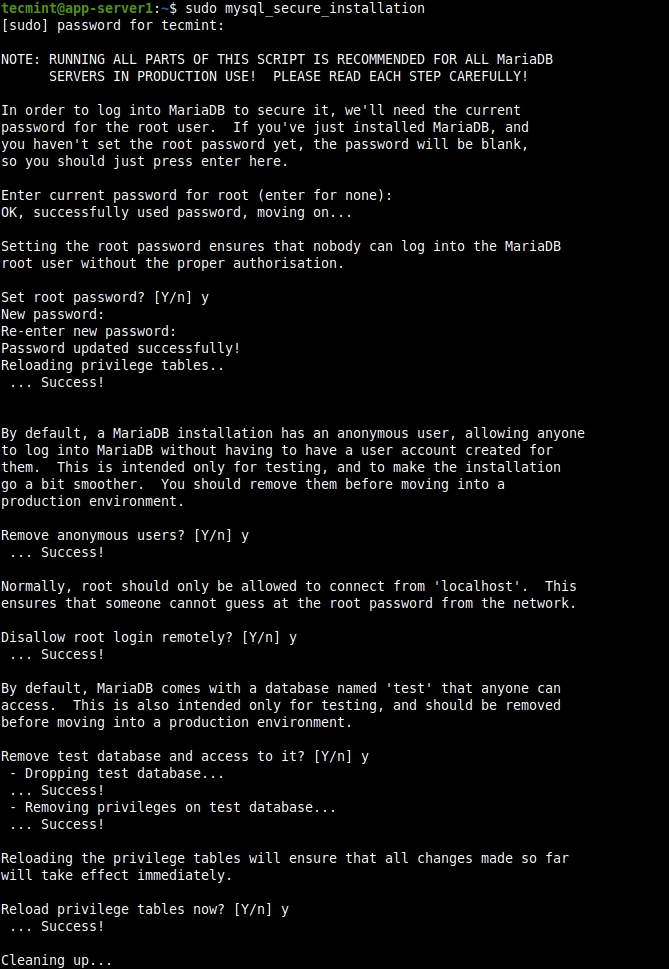
Also, secure your MariaDB installation:
Copy Me
sudo mysql_secure_installation
As you run the above command, it will give a text-based wizard to secure your Database server. Here are the questions it will ask:
Copy Me
Enter current password for root (enter for none): Press ENTER.
Switch to unix_socket authentication? Press N, then ENTER.
Change the root password? Press Y, then ENTER.
Remove anonymous users? Press Y, then ENTER.
Disallow root login remotely? Press Y, then ENTER.
Remove test database and access to it? Press Y, then ENTER.
Reload privilege tables now? Press Y, then ENTER.
Install PHP and its extension
phpMyAdmin is a PHP-based SQL database management software, hence we need this scripting language on our Ubuntu system along with some common PHP extensions.
Also, enable PHP fpm to start with FPM, if not already:
Copy Me
sudo systemctl enable php8.1-fpm --now
4. Install phpMyAdmin on Ubuntu 22.04
Well, the one way to install phpMyAdmin is to use the APT package manager that will download and install it using Ubuntu’s repository.However, the thing which one should be aware of is that the version of phpMyadmin installed using APT will not be the latest one. It is because the long-term version of Ubuntu uses extremely stabled packages, therefore you won’t get the latest release of the software. In such a situation, we can manually download the package of phpMyadmin to configure. Let’s see how to do that.
Download phpMyAdmin latest version
The given command will automatically fetch and save the latest phpMyAdmin’s compressed file in Tar format. Just copy and execute it in your command terminal:
Once the file is downloaded on your system, extract and move it to your webroot directory.
Extraction:
Copy Me
tar xvf phpMyAdmin-*-all-languages.tar.gz
Now, move it:
Copy Me
sudo mv phpMyAdmin-*/ /var/www/html/phpmyadmin
Also, don’t forget to create a Temporary folder called ‘tmp’ inside the extracted directory otherwise this will create a warning on the phpMyAdmin interface.
Copy Me
sudo mkdir -p /var/www/html/phpmyadmin/tmp
5. Add Blowfish cipher string
To work properly, phpMyAdmin needs Blowfish cipher string in the configuration file for cookie authentication. However, by default, there is no main configuration file because we are setting up the phpMyAdmin manually. Instead, there is a sample configuration file that we can rename and use. Here is a command for that:
sudo find /var/www/html/phpmyadmin/ -type d -exec chmod 755 {} \;
Copy Me
sudo find /var/www/html/phpmyadmin/ -type f -exec chmod 644 {} \;
6. Create Apache Vhost configuration file
We don’t want to serve the phpMyAdmin user interface on our root domain or IP address, hence, we either use subdomain or subfolder. Here we are serving it in a subfolder. Hence, create a configuration file for it.
Alias /phpmyadmin /var/www/html/phpmyadmin

<Directory /var/www/html/phpmyadmin>
Options Indexes FollowSymLinks
DirectoryIndex index.php

<IfModule mod_php8.c>
AddType application/x-httpd-php .php

php_flag magic_quotes_gpc Off
php_flag track_vars On
php_flag register_globals Off
php_value include_path .
</IfModule>

</Directory>

# Authorize for setup
<Directory /var/www/html/phpmyadmin/setup>
<IfModule mod_authn_file.c>
AuthType Basic
AuthName "phpMyAdmin Setup"
AuthUserFile /etc/phpmyadmin/htpasswd.setup
</IfModule>
Require valid-user
</Directory>

# Disallow web access to directories that don't need it
<Directory /var/www/html/phpmyadmin/libraries>
Order Deny,Allow
Deny from All
</Directory>
<Directory /var/www/html/phpmyadmin/setup/lib>
Order Deny,Allow
Deny from All
</Directory>
Save the file- Ctrl+O hit Enter, and exit using Ctrl+X.
Activate new configuration:
Copy Me
sudo a2enconf phpmyadmin.conf
Restart the Apache Webserver
To make the changes apply successfully, restart the Apache webserver.
Copy Me
sudo systemctl restart apache2
7. Access phpMyAdmin web interface
Enter the server IP address or domain name along with /phpmyadmin folder in the browser URL to access this web database management platform.
For example:
Copy Me
https://server-ipaddress/phpmyadmin
or
Copy Me
http://your-domain.com/phpmyadmin
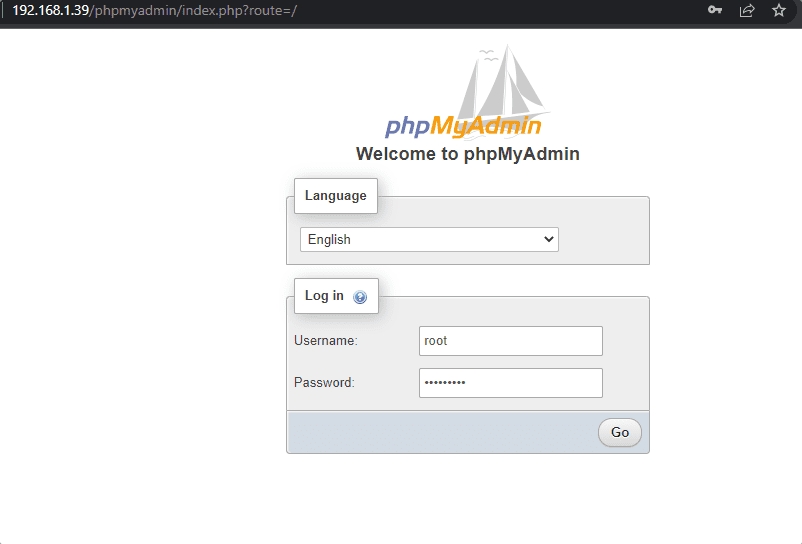
Enter the MySQL database root user and its password to login phpMyAdmin.
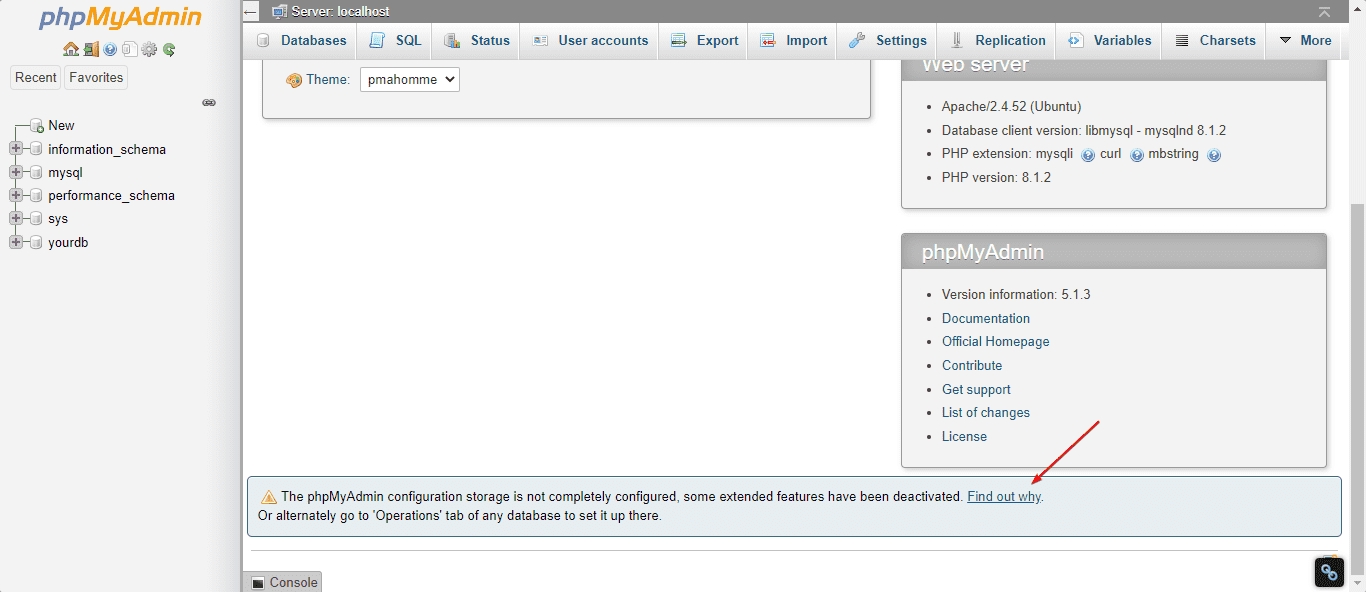
Note: If you get this notification at the footer – The phpMyAdmin configuration storage is not completely configured, some extended features have been deactivated. Find out why. Or alternately go to the ‘Operations’ tab of any database to set it up there.
Then simply click on the Find out why link and click the “Create” link to automatically create phpmyadmin database.
Conclusion
In this way, we can swiftly install the phpMyAdmin on Ubuntu 22.04 LTS Jammy for managing our MySQL or MariaDB database with the help of a web-based graphical user interface. Because of its security, its extensive functionality, and its comfortable operation, PhpMyAdmin is considered the standard for the administration of MySQL and MariaDB databases. It is included in web hosting offers at many Internet Service Providers (ISPs) and is usually part of the basic configuration of Dedicated and Linux Virtual Servers (VPS). The most common tasks include regularly creating a backup, transferring databases to other servers, and troubleshooting technical failures.


