How to Install phpMyAdmin on Ubuntu
How to Install phpMyAdmin on Ubuntu HOW-TO
The MySQL database system is the most popular, open-source, relational database. Many other projects, including WordPress, are backed by a MySQL database and rely on its extensive feature list and simple setup. For beginners, or those that are lazy, there is the phpMyAdmin tool to help us with the maintenance and interface of MySQL.
Accessed from your web browser, phpMyAdmin is a PHP-based frontend control panel that allows you to easily manage your MySQL databases and users, review SQL activity, import and export database backups, run searches, and more.
In this guide, we’ll cover the recommended method to install phpMyAdmin from the Ubuntu packages, and how to secure phpMyAdmin. We’ll also go over installing phpMyAdmin from source, although this is not recommended in a production environment.
Requirements for Installing phpMyAdmin on Ubuntu
Before installing phpMyAdmin, we need to meet some basic requirements:
A LAMP stack (Linux, Apache, MySQL, and PHP) installed
PHP 5.2.0 or newer
$ php -vPHP 5.5.9-1ubuntu4.6 (cli) (built: Feb 13 2015 19:17:11)Copyright (c) 1997-2014 The PHP GroupZend Engine v2.5.0, Copyright (c) 1998-2014 Zend Technologies with Zend OPcache v7.0.3, Copyright (c) 1999-2014, by Zend Technologies
The PHP mysql or mysqli extensions
$ php -m | grep mysqlmysqlmysqli
MySQL 5.0.1 or newer
$ mysql -vWelcome to the MySQL monitor. Commands end with ; or g.Your MySQL connection id is 39Server version: 5.5.41-0ubuntu0.14.04.1-log (Ubuntu)
Install phpMyAdmin from Ubuntu Packages
The default Ubuntu repositories stay up-to-date with the latest stable releases of phpMyAdmin, and this is the recommended installation process for a production environment.
Step 1: Update Package Index
First, we need to make sure our local server is pulling the latest updates.
Step 2: Install phpMyAdmin Package
Now we can install the latest version of phpMyAdmin.
sudo apt-get install -y phpmyadmin
Step 3: Configure phpMyAdmin Package
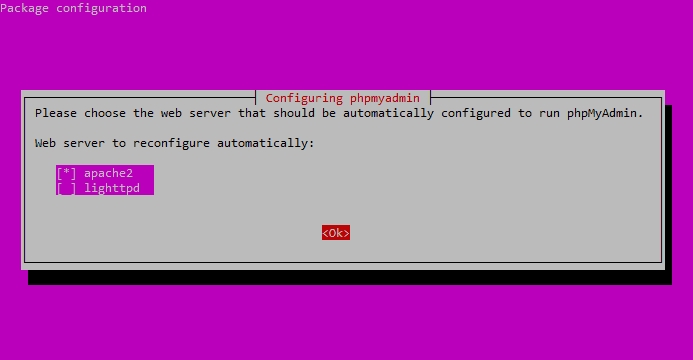
After installing phpMyAdmin, you will be presented with the package configuration screen.
Press the SPACE bar to place an “*” beside “apache2.”
Select “apache2” and hit OK.
The installation process will continue until you’re back at another package configuration screen.
Select “Yes” and hit ENTER.
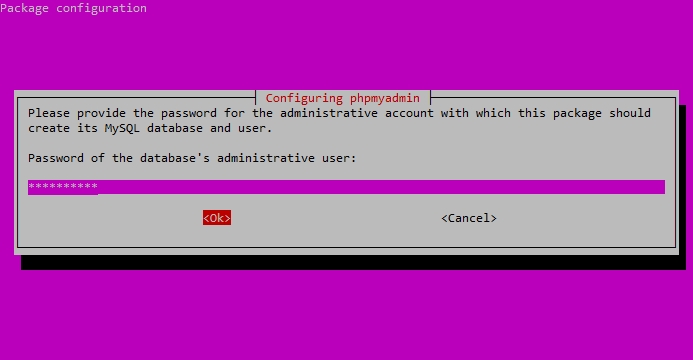
You will be prompted for your database administrator’s password.
Enter your DB administrator’s password.
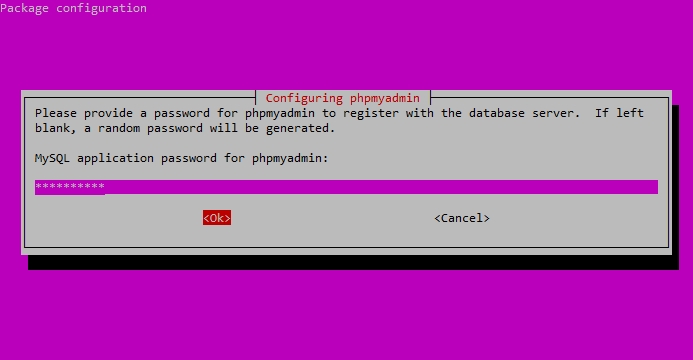
Enter the password you’d like to use to access the phpMyAdmin interface.
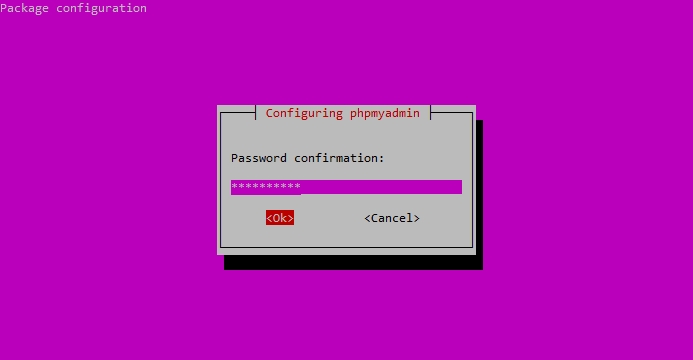
Confirm your phpMyAdmin password.
After the installation process completes, it adds the phpMyAdin configuration file here:
/etc/apache2/conf-enabled/phpmyadmin.conf
Enable PHP mcrypt Module
Check if the PHP mcrypt module is already in use:
If you don’t get any results, install the PHP mcrypt module with:
Now when we check, you should see mcrypt enabled:
$ php -m | grep mcryptmcrypt
Restart Apache
Now we should restart the Apache web server for changes to take affect:
sudo service apache2 restart
Access phpMyAdmin for the First Time
Now you can log in to phpMyAdmin by going to your server followed by /phpmyadmin.
You can just use http://YOUR_SERVER_IP/phpmyadmin if you don’t have domains set up yet.
Log in to phpMyAdmin as the root user.
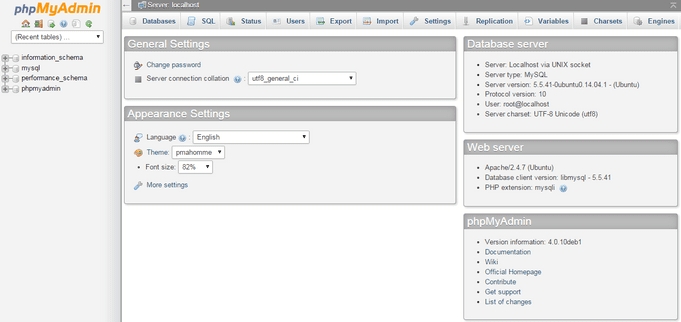
You should now see the phpMyAdmin dashboard.
Secure and Lock Down phpMyAdmin Interface
Naturally, because phpMyAdmin is such a common application installed on many web servers, it is a popular target for unauthorized access attempts. We can easily secure our phpMyAdmin installation by using Apache’s built-in .htaccess authentication.
Step 1: Edit phpMyAdmin’s Apache Config
We want to edit the phpMyAdmin Apache config that was created earlier:
sudo vi /etc/apache2/conf-available/phpmyadmin.conf
Add AllowOverride “ALL” directive below the DirectoryIndex:
Options FollowSymLinks DirectoryIndex index.php AllowOverride ALL ...
Step 2: Restart Apache to Accept Config Changes
Restart Apache so our changes take affect:
sudo service apache2 restart
Step 3: Create an .htaccess File
Now that we’ve enabled overrides for our phpMyAdmin application from Apache, we need to actually create an override with an .htaccess file.
sudo vi /usr/share/phpmyadmin/.htaccess
Add this text:
AuthType BasicAuthName "phpMyAdmin Users Only"AuthUserFile /etc/phpmyadmin/.htpasswdRequire valid-user
Step 4: Create an .htpasswd File for Authentication
First we need the htpasswd utility. If you don’t already have this installed, use the following:
sudo apt-get install apache2-utils
Now we can create a secure user for our phpMyAdmin application with the command:
$ sudo htpasswd -c /etc/phpmyadmin/.htpasswd phpmyadminNew password:Re-type new password:Adding password for user phpmyadmin
If for some reason you wanted to give others access to the phpMyAdmin login screen but didn’t want them using your .htaccess credentials, you can create additional secure users with:
sudo htpasswd /etc/phpmyadmin/.htpasswd anotheruser
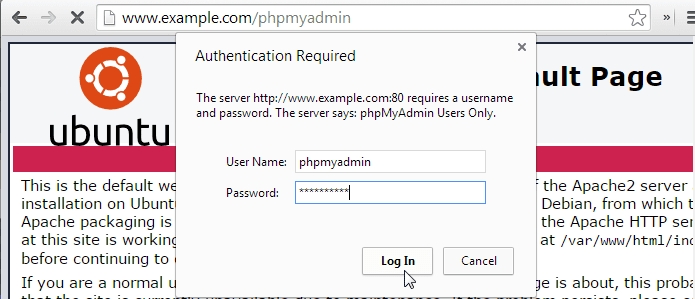
You should now see the .htaccess password prompt we created
Install phpMyAdmin from Source
While it’s not recommended for production servers, because you have to manually ensure your install of phpMyAdmin is kept up-to-date, you can also install phpMyAdmin from source.
Step 1: Identify Apache’s DocumentRoot
We need to find Apache’s DocumentRoot so we know where to place our phpMyAdmin files:
$ grep DocumentRoot /etc/apache2/sites-available/000-default.conf DocumentRoot /var/www/html
In this case, we’ll need to put the phpMyAdmin files in /var/www/html.
Step 2: Download Latest Version of phpMyAdmin
The stable version of phpMyAdmin at the time this article was written: phpMyAdmin 4.3.11.1 (released 3/4/2015).
Visit the phpMyAdmin download page to grab the latest version of phpMyAdmin.
I ended up with a phpMyAdmin-4.3.11.1-english.tar.gz file in my /var/www/html directory.
$ cd /var/www/html$ lsindex.html phpMyAdmin-4.3.11.1-english.tar.gz
Step 3: Unpack phpMyAdmin Files
sudo tar xvzf phpMyAdmin-4.3.11.1-english.tar.gz
Now rename the phpMyAdmin-4.3.11.1-english directory:
sudo mv phpMyAdmin-4.3.11.1-english phpmyadmin
Remove the phpMyAdmin files:
sudo rm phpMyAdmin-4.3.11.1-english.tar.gz
Step 4: Secure /phpmyadmin Directory
We want to set up a specific user for our phpMyAdmin install.
$ sudo adduser phpmyadminAdding user `phpmyadmin' ...Adding new group `phpmyadmin' (1001) ...Adding new user `phpmyadmin' (1001) with group `phpmyadmin' ...Creating home directory `/home/phpmyadmin' ...Copying files from `/etc/skel' ...Enter new UNIX password:Retype new UNIX password:passwd: password updated successfully
sudo chown -R phpmyadmin.phpmyadmin /var/www/html/phpmyadmin
Step 5: Update phpMyAdmin config.inc With Install Wizard
To use the phpMyAdmin install wizard, we first need to set up the config.inc file.
cd /var/www/html/phpmyadminsudo mkdir configsudo chmod o+rw configsudo cp config.sample.inc.php config/config.inc.phpsudo chmod o+w config/config.inc.php
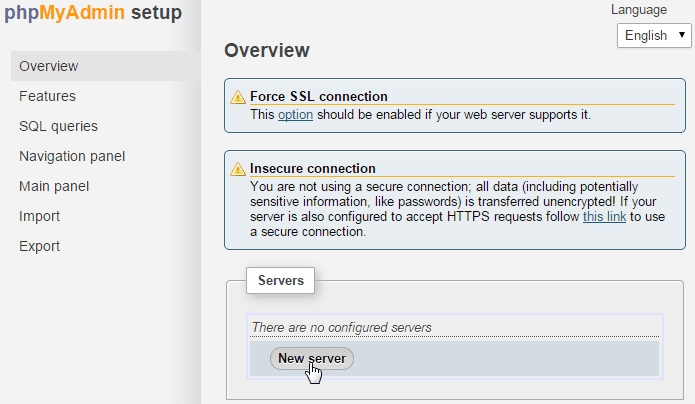
Step 6: Run phpMyAdmin Install Wizard
To begin the installation of phpMyAdmin, access the installation URL at:
http://example.com/phpmyadmin/setup/index.php
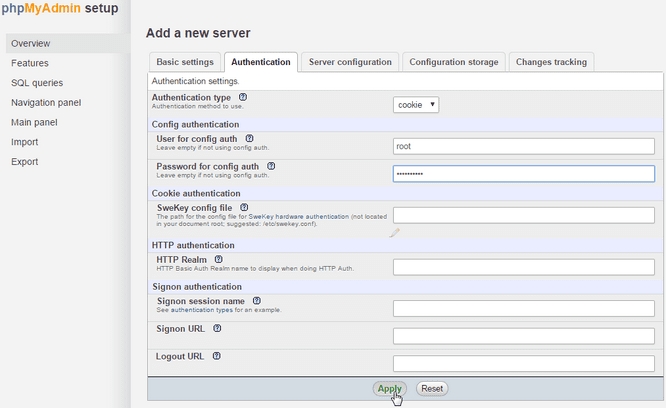
Under the “Servers” section, click on “New Server.”
In the “Password for Config Auth” box, type in your MySQL root password.
Remove the phpMyAdmin /config directory for security.
sudo rm -rf /var/www/html/phpmyadmin/config